Prerequisites:
- Appium Step by Step Installation: Installing Appium.dmg and Ruby on Mac
- Appium Testers Perspective for creating iOS Development Certificate, iOS App Identifier, iOS Device, iOS Development Provisioning Profile.
- Sign up for the iPhone Developer Program. This is a requirement for testing your applications on a real iOS device. Sign up for the iPhone Developer Program at http://developer.apple.com/iphone/program/. (Cost $99 USD)
- Mac
- Xcode 6.3.2
- Xcode 5.1.1
- Xcode Command Line Tools (used for git)
- iPhone Developer Program
- iOS Certificates
- iOS App Ids
- iOS Devices
- iOS iOS Provisioning Profiles
- Chrome Web Browser
- KeyChain Access (9.0)
- iPad Mini (7.0.4)
- Appium (4.0)
- iPhone Developer Program Account
- iPhone 5s (8.3)
Special thanks to James Dehart for the research that made this training possible.
Accompanying Youtube Video:
- https://youtu.be/Y52Z3kp6yQ8
- Open Appium.dmg

Open Terminal

Open Xcode 6.* or newer

Open Xcode 5.1.1
Open Web Browser

Download Appium Sample-Code from Github
We are going to download, build, sign and install the Appium TestApp authored by Isaac A. Murchie (shown below).


In your clipboard is the url "https://github.com/appium/sample-code.git"


At the command prompt in terminal "$". Don't type $
Setup the folder structure
- $ pwd
- You should see /Users/??? with ??? being your user or computer name.
- My suggestion is to create a folder called dentedghost to store the examples but you can put it anywhere you want.
- If the directory doens't exist
- $ mkdir dentedghost
- $ cd dentedghost
- Now download a copy of sample-code from github
- $ git clone https://github.com/appium/sample-code.git
- $ ls
Terminal Results:- $ pwd
- You should see /Users/??? with ??? being your user or computer name.
- My suggestion is to create a folder called dentedghost to store the examples but you can put it anywhere you want.
- If the directory doens't exist
- $ mkdir dentedghost
- $ cd dentedghost
- Now download a copy of sample-code from github
- $ git clone https://github.com/appium/sample-code.git
- $ ls

Open TestApp in xCode
Open Xcode 6.* or newer then click File -> Open
In the sample-code directory transverse to TestApp then select TestApp.xcodeproj
- sample-code
- sample-code
- apps
- TestApp

You should now see something similar to

Bundle Identifier - Target
Make sure the folder icon is select then click on TestApp. To the right of that you will see (Projects/Targets) icon. Select Targets -> TestApp. Make sure the "General" tab is selected.
Notice the Bundle identifier is "io.appium.TestApp" and the error "No matching provisioning profile found".

Notice the Bundle identifier is "io.appium.TestApp" and the error "No matching provisioning profile found".
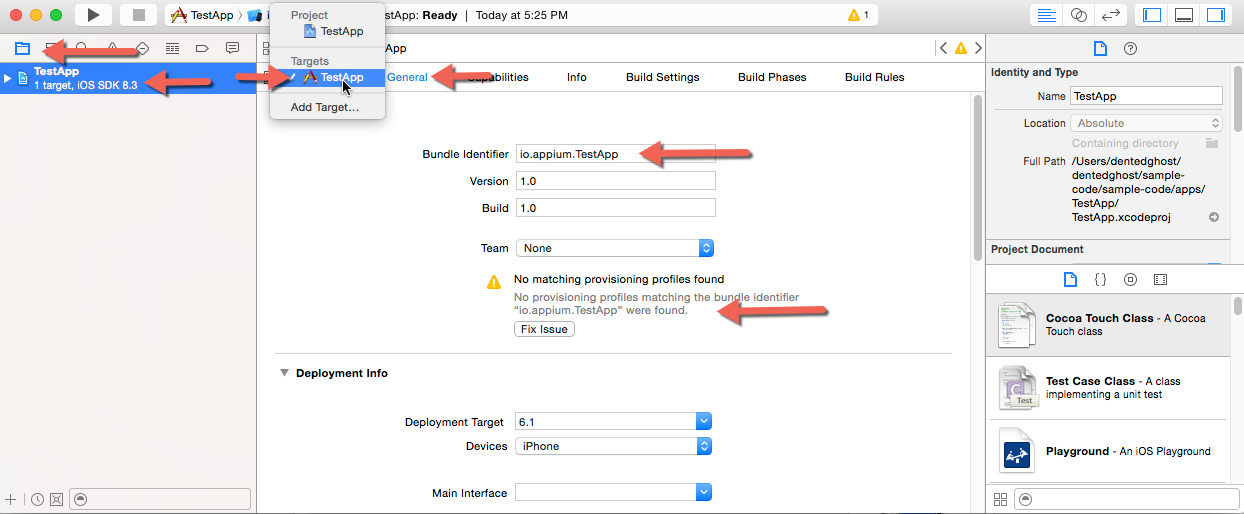
Before proceeding you will have needed to create an unique Bundle Id (iOS App ID Identifier) for the TestApp.
In the previous Instructional Blog I created the Bundle ID "com.dentedghost.TestApp". You will need to have your own unique Bundle ID "com.somethinguniqe.TestApp"
In the previous Instructional Blog I created the Bundle ID "com.dentedghost.TestApp". You will need to have your own unique Bundle ID "com.somethinguniqe.TestApp"
Confirm the Bundle Id is located Apple iPhone Developer Account

Now update Bundle identifier then select the Team pulldown and choose your App Id login.

The bundle identifier error should disappear.

Deployment Info - Target
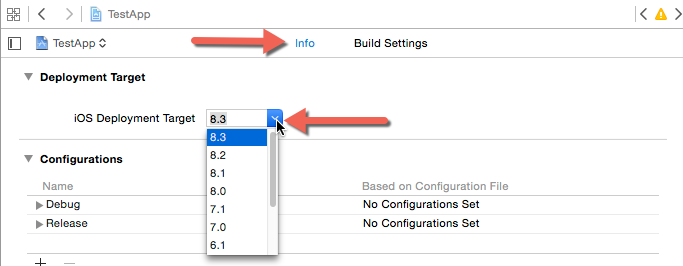
On your iOS device that your going to use for automation get the Software/Platform Version. Go to Settings -> General -> About then get the Version


Now update the Deployment Target with the Version Number and choose the appropriate Devices Type in the pull down.

Ensure your iOS device is registered in your Apple iPhone Developer account in iOS Devices.

Ensure your iOS Devices are included as part of the Development Provisioning Profile. Select the Development Provisioning Profile then click "Edit".

Ensure the single or multiple iOS Test Device(s) are selected. If not you will need to select and regenerate the Development Provisioning Profile.

Code Signing - Target
Select the "Build Settings" tab then page down to Code Signing.


Update all the iOS Developer to your iOS Development Certificate


Update the Provisioning Profile to your iOS Development Provisioning Profile


Deployment Target - Project
Select the Target Icon

Select Project -> Test App

Update the iOS Deployment Target in Project to the same version as your test device.
Code Signing - Project
Select the "Build Settings" tab

Update all the Code Signing Identities to your iOS Development Certificate

Update the Provisioning Profile to your iOS Development Provisioning Profile


Update all the Code Signing Identities to your iOS Development Certificate

Update the Provisioning Profile to your iOS Development Provisioning Profile

Manage Schemes
In Xcode select Product -> Scheme -> Edit Scheme. You should see a check next to you App name.

We need to update all Build Configuration to be Debug.

Select anyone with Release then select the Build Configuration pull down and update to Debug.


When completed all will be set to Debug for Build Configuration.


Build
Select the Real iOS Device


Select Product -> Clean

After Clean is finished. Select Product -> Build

After a successful build you will see the Build "App Name": Succeeded
Archive
Select Product -> Archive

After a successful Archive you will see

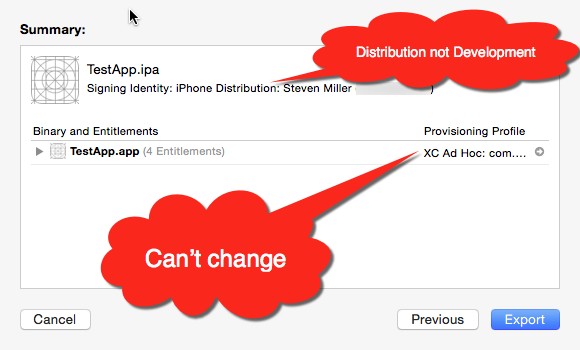
Distribute/Export
If you were a Developer you would:

- Select Export
- Save for Ad Hoc Deployment
- Select Develop Team for provisioning
The problem is with Xcode 6.0.1 and newer, Xcode auto assigns the provision and you can't change it. Instead of the iPhone Development you get iPhone Distribution. Which then causes the main reason most people can't test on a real iOS Device and get the error: "The app must be signed with a development identity (i.e. iOS Developer)" which has hundreds of search results on Google.
Using Xcode 5.1.1 to Distribute/Export
Open XCode 5.1.1 then select Window -> Organizer. Note you can have more then one version of Xcode open at the same time.

Select the Archives Tab

You will see all the Archives you created in Xcode 6.*.*. Choose the specific Archive you want to distribute with Xcode 5.1.1 then click the "Distribute..." button.

Select Ad Hoc Deployment then click Next

Select the Provisioning Profile pull down and select your Development Provisioning Profile then click Export.

Select the location to save the TestApp.ipa file. Rename as needed then click Save.

The results should be similar to


Select the Provisioning Profile pull down and select your Development Provisioning Profile then click Export.

Select the location to save the TestApp.ipa file. Rename as needed then click Save.

The results should be similar to

Install from Appium
Open Appium 1.4.0. and click on iOS Settings. (Special Note this version of Appium no longer uses troublesome fruitstrap to install)

Select Choose and select the TestApp.ipa. Select the App Path and Paste it into BundleID

Then unclick App Path. Obviously, if you have the path to the App you can skip a step and just paste it into BundleID.

If you don't remember the UDID then Open Xcode 6.*.* In the menu select Window -> Devices


Enter a descriptive name for your iOS Test Device in Force Device. Select the correct iOS Platform Version. Paste the iOS Test Device Identifier into UDID.

Click on iOS Settings to Save


Launch App to install App on Real iOS Device and Open up App
The debug windows show the App in not installed then it installs the App.


If you don't remember the UDID then Open Xcode 6.*.* In the menu select Window -> Devices
Select your iOS test device under Devices. Copy the Identifier (UDID).


Click on iOS Settings to Save

Enable Prelaunch for testing demonstration
To help demonstrate the App is getting installed correctly select General Setting and make sure "PreLaunch Application" is checked. Click on General Settings to Save.
Launch App to install App on Real iOS Device and Open up App

The debug windows show the App in not installed then it installs the App.

Inspecting the Real iOS Device we see the TestApp has been installed.

With PreLaunch select it will continue to communicate until the App is opened on the Real iOS Device.

TestApp.ipa successfully installed and launched from Appium 1.4.0

Open App in Inspector
While TestApp is open on the Real iOS device click on the Inspector icon.

Find the element name: intergerA then click on the "Text" tab then click "Send Keys"

The results shown in Inspector view window.

The results shown on the Real iOS Device

Awesome Tutorial
ReplyDeleteHi,
ReplyDeleteI am testing an app given by our Vendor.
The Vendor gives me the .ipa file which i have to automate.
If the vendor follows the above steps and gives me the .ipa file, can i automate using my iPhone, if my phone udid is configured in that provisioning profile?
Please help, cannot figure it out.
Go for Appium training in chennai for real time mobile automation testing training with real time project support.
ReplyDeleteUI Automation Tools with real time scenarios You can contact 8122241286 for Best APPIUM and selenium Training in Chennai
Being new to the blogging world I feel like there is still so much to learn. Your tips helped to clarify a few things for me as well
ReplyDeleteiOS App Development Company
iOS App Development Company
It's amazing blog And useful for me Thanks
ReplyDeleteiOS App Development Online Course Bangalore
I really liked your Information. Keep up the good work. Apple Developer Support
ReplyDelete